Shutter Speed, a key element of photography controls the amount of time the camera’s sensor is exposed to light. At the same time it is important for the amount of motion blur and overall clarity in the image that is produced.
Shutter

Exactly, the shutter in a camera plays a crucial role in controlling the exposure of an image. By opening and closing at specific intervals, it regulates the amount of light that reaches the camera’s sensor. This control over the duration of exposure enables photographers to capture properly exposed images in various lighting conditions, ranging from brightly lit scenes to low-light environments. In essence, the shutter acts as a gateway for light, allowing photographers to creatively manage the amount of light hitting the sensor and thereby influence the final appearance of the photograph.
The chosen shutter speed essentially controls the duration of time that the camera’s sensor is exposed to light, playing a crucial role in determining the final image’s brightness, capturing or blurring motion of subjects, and influencing the portrayal of fast-paced scenes in the photograph.
Two bodies and one soul. Photography – Abin Alex | Camera: Canon EOS 5D Mark IV, Focal Length: 360 mm, Aperture: f/5.6, Shutter Speed: 1/500, ISO: 800
According to legend, Mathew Brady operated a shutter around 1850. Between 1850 and 1880, shutters weren’t given much consideration. Thus, today’s shutters produced before 1880 are extremely rare.
These two main types of shutters used in cameras during the 1880s were the focal plane shutter and the rotary shutter. The focal plane shutter operated by moving a curtain or blinds across the film plane, controlling the exposure time. The rotary shutter, on the other hand, was characterized by a rotating disc with regularly spaced openings that allowed light to pass through, creating intermittent exposures. These advancements in shutter technology played a crucial role in improving the capabilities of early hand-held cameras and contributed to the growth of photography as an art form and a technological innovation.
Leaf shutters
Focal-plane shutters
Before the digital era, cameras relied on mechanical shutters to control the exposure of light onto the film. These shutters were composed of physical blades or curtains that would open and close at different speeds, allowing light to reach the film for a specific duration. This mechanism was crucial for controlling the amount of light hitting the film and capturing images with varying exposure times. The mechanical shutter’s design and construction had a significant impact on the camera’s overall performance and capabilities.
In the present day, despite the advancement of digital sensors, both mechanical and electronic shutters continue to play distinct roles in photography, particularly in DSLR (Digital Single Lens Reflex) cameras. The mechanical shutter still exists in modern DSLRs and is utilized for its reliability, precision, and ability to handle a wide range of exposure times, including long exposures and scenarios with varying lighting conditions. The mechanical shutter’s physical nature ensures consistent results across different settings.
On the other hand, electronic shutters have gained popularity due to their unique advantages. Electronic shutters work by directly controlling the sensor’s readout without any physical movement, which can result in faster shutter speeds, quieter operation, and the absence of mechanical wear and tear. This makes electronic shutters well-suited for scenarios where rapid bursts of shots are required, such as in sports or wildlife photography. However, electronic shutters may encounter limitations in dealing with fast-moving subjects or artificial lighting sources, which can lead to issues like rolling shutter distortion or flickering.
In summary, while mechanical shutters have a long-standing history and are still relevant for their reliability and versatile performance, electronic shutters have introduced new possibilities for capturing images efficiently and quietly, especially in situations that demand speed and precision. The coexistence of these two shutter types in modern DSLR cameras reflects the balance between tradition and innovation in the ever-evolving field of photography.
Leaf shutters

Photographers using cameras with leaf shutter designs, such as the iconic Kodak Brownie, often had to rely on external factors like available lighting conditions and the use of different aperture settings to indirectly influence the exposure time. Since these cameras lacked the sophisticated mechanisms seen in modern shutters, adjusting the shutter speed precisely for various shooting scenarios was a cumbersome process. This limitation could result in difficulties capturing fast-moving subjects or achieving the desired creative effects that depend on precise control over exposure time. Despite these challenges, early photographers developed creative techniques and strategies to work within the constraints of these leaf shutter designs, contributing to the evolution of photography as an art form.

Leaf shutters play a crucial role in photography by offering precise control over the exposure time. When the shutter button is pressed, these leaves rapidly open and then close, allowing light to pass through the camera’s lens and onto the sensor for a specific period. This controlled exposure duration is what determines the sharpness of moving subjects, the amount of motion blur, and the overall clarity of the image. By adjusting the speed at which the leaves open and close, photographers can create various artistic effects, freeze fast-paced action, or introduce intentional motion blur. Additionally, leaf shutters often work in conjunction with other exposure settings like aperture and ISO to achieve the desired final image. Their design and operation make them a valuable tool for photographers aiming to capture the perfect shot in different lighting conditions and scenarios.
While leaf shutter blades in a camera lens control the exposure time by opening and shutting in a circular pattern, enabling light to reach the camera sensor or film for a particular period of time, aperture blades control the amount of light entering the camera by altering the size of the aperture.
As cameras evolved and technology advanced, the leaf shutter mechanism underwent refinements that improved its precision, speed, and durability. This made leaf shutters particularly well-suited for certain photography styles, such as portrait and studio photography, where precise control over the exposure and the ability to sync with external lighting were crucial. On the other hand, focal-plane shutters, while inherently simpler in design, proved capable of achieving faster shutter speeds, making them preferable for capturing fast-moving subjects or scenes with a high level of ambient light. This distinction in functionality led to the coexistence of both shutter types in various camera models, each catering to specific photographic needs and preferences.
Medium format cameras, such as those produced by manufacturers like Hasselblad, Mamiya, and Phase One, often incorporate leaf shutters into their systems. These leaf shutters, typically mechanical in nature, allow for precise control over exposure times. Interestingly, Hasselblad, a prominent name in the medium format industry, has embraced electronic leaf shutters in their more recent mirrorless camera offerings, showcasing their commitment to evolving technology and providing photographers with advanced tools for their creative endeavors. Two curtains are moved over the sensor plane by these shutters, which are placed very close to the camera’s image sensor. The first curtain quickly opens when the shutter button is depressed, exposing the sensor to the incoming light. How rapidly the second curtain closes, shielding the sensor from light exposure, establishes the exposure time. Photographers can use this technology to acquire photographs with finely tuned exposure control, allowing them to freeze moving scenes or produce artistic effects with lengthy exposures. The ability to attain quick shutter speeds, which is necessary for capturing action images or scenes with high illumination, is one of the many benefits that focal-plane shutters offer. Additionally, they enable faster synchronization with external flash units, allowing photographers to use more light while preserving a shallow depth of field. However, focal-plane shutters have drawbacks, such as the potential for the “rolling shutter” effect, which causes fast-moving subjects to look distorted as a result of the curtains’ successive movement. Focal-plane shutters are located inside the camera body, as opposed to leaf shutters, which are built into the camera lenses. Because of their versatile design, they may be used with many different lenses and camera systems, which contributes to their widespread use in contemporary DSLR and mirrorless cameras. Overall, focal-plane shutters are a crucial piece of equipment that greatly affects the functionality and artistic potential of these kinds of cameras.

Focal-plane shutter

By strategically opening and closing at different speeds, focal plane shutters regulate the amount of time that light hits the camera’s sensor. This control over exposure duration enables photographers to adapt to various lighting conditions and subjects, whether freezing fast-moving action with a quick shutter speed or creating artistic effects like motion blur with a longer exposure. The synchronized coordination of the shutter with the sensor ensures that each part of the sensor receives light uniformly, resulting in a coherent and properly exposed image. Focal plane shutters have become an integral component of modern digital cameras, enabling photographers to unleash their creativity by manipulating time and light.
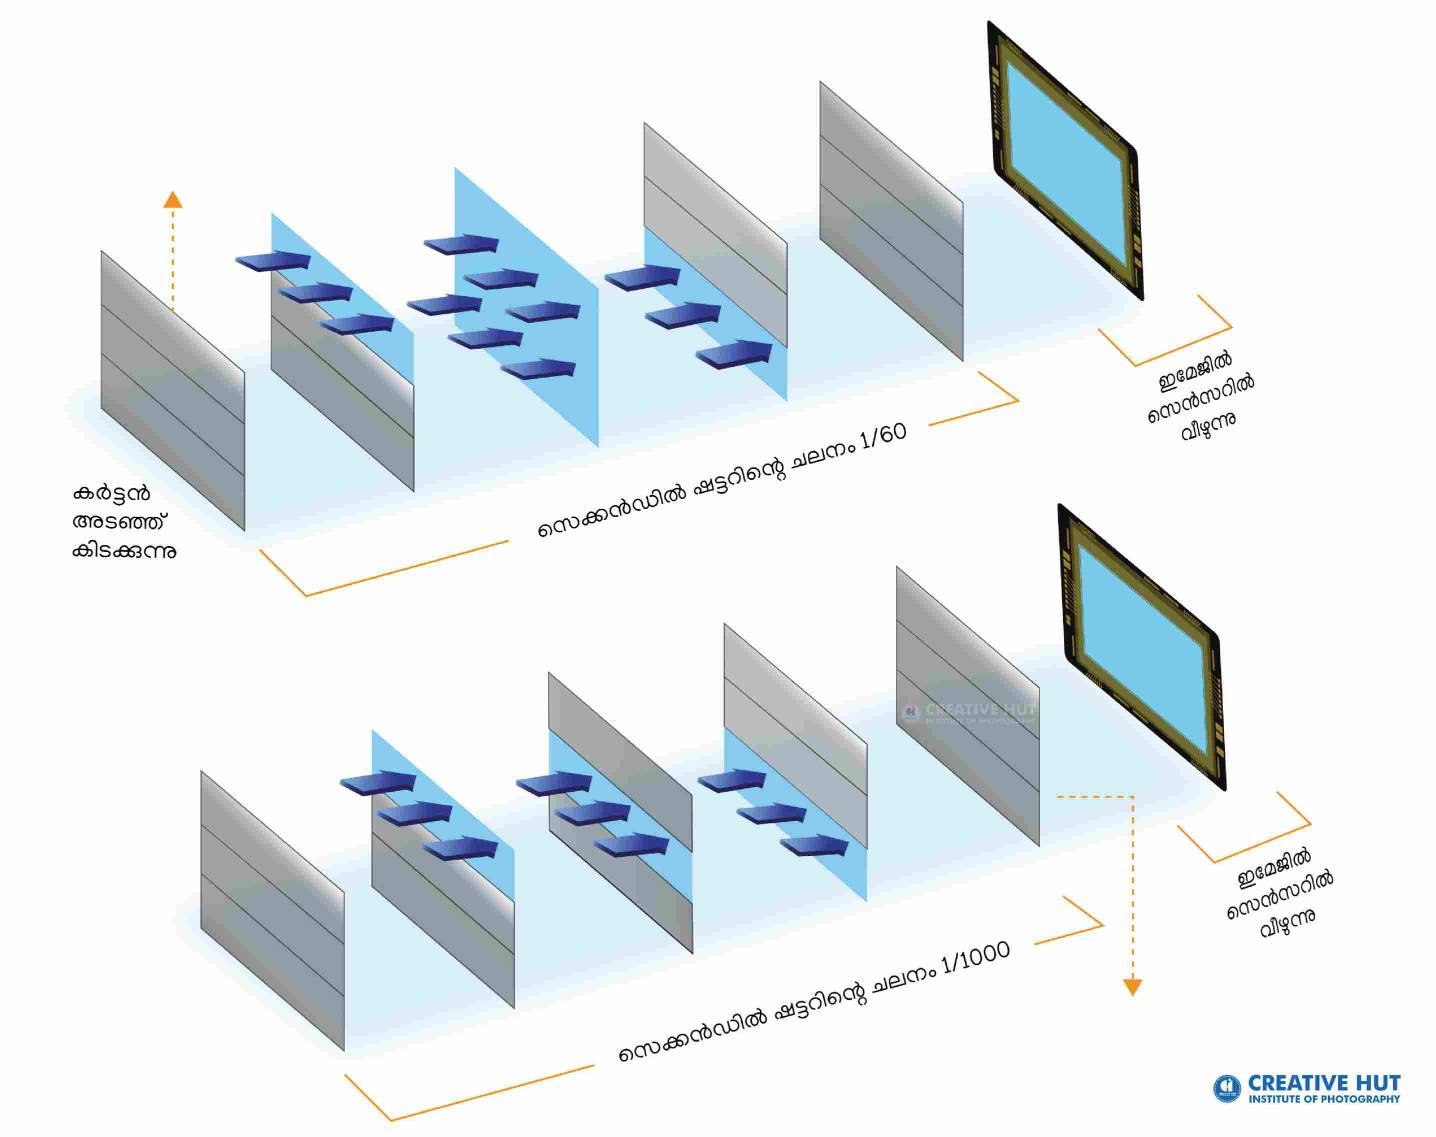
In a typical camera’s mechanical focal-plane shutter mechanism, the front curtain, also referred to as the first curtain, initiates the exposure by quickly moving aside to reveal the camera’s sensor. Following this, the rear curtain, or second curtain, follows in sequence to cover and conclude the exposure. This coordinated movement of the curtains controls the duration of light exposure to the sensor, allowing for precise control over the amount of light that reaches the camera’s sensor and contributes to capturing a properly exposed image.

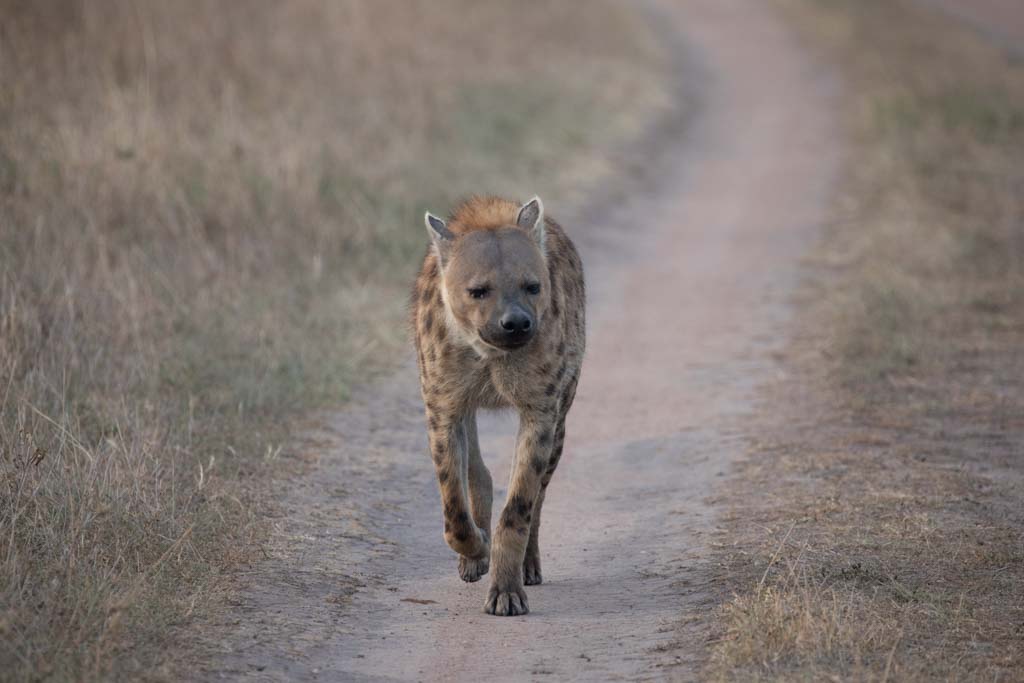
Don’t limit ideas and dreams. May it flourish in greater heights. Photography – Abin Alex | Camera: Canon EOS 5D Mark IV, Focal Length: 400 mm, Aperture: f/14, Shutter Speed: 1/1000, ISO: 800
Furthermore, the interaction between the front and second curtains plays a crucial role in preventing the distortion of fast-moving subjects in photographs. By coordinating their actions, the first curtain initiates the exposure, while the second curtain follows closely, maintaining a constant gap between them. This mechanism creates a uniform scanning motion across the sensor, reducing the likelihood of image distortion and ensuring that moving objects appear natural and undistorted in the final image. This intricate dance of the curtains showcases the meticulous engineering that underlies the art of photography, where technology converges with creativity to capture fleeting moments with unparalleled precision and clarity.
When dealing with fast-moving subjects, such as sports events or wildlife in action, the limitations of a focal plane shutter’s opening and closing speed become apparent. The duration the curtains remain open determines the exposure time, allowing light to hit the camera’s sensor. If the subject is moving rapidly during this time, it can result in motion blur, where the subject appears blurry due to its movement while the sensor is still capturing the image.
Photographers often encounter situations where they need to freeze the motion of a subject in order to capture a clear and sharp image. However, the inherent design of focal plane shutters imposes constraints on the achievable shutter speed. This limitation can be especially problematic in scenarios where extremely fast shutter speeds are required to capture subjects with minimal motion blur. In such cases, photographers might opt for alternative techniques like using electronic shutters or high-speed flash synchronization to mitigate the effects of the focal plane shutter’s limitations.
In contrast, other types of shutters, such as leaf shutters found in some medium format and compact cameras, operate differently. They are positioned within the lens assembly and can offer faster and more precise control over exposure times. This makes them better suited for capturing fast-moving subjects with minimal motion blur, as they can achieve faster shutter speeds without encountering the same limitations as focal plane shutters.
In summary, while focal plane shutters are versatile and commonly used in various camera systems, their limitations in terms of opening and closing speed can impact the ability to capture fast-moving subjects without motion blur. Photographers often need to consider these limitations and explore alternative techniques to achieve their desired results when dealing with such scenarios.
In modern cameras, the process of opening and closing the shutter is achieved using servo motors and springs, replacing the older mechanical mechanisms found in older SLRs. This operation is precisely controlled by an integrated circuit chip, which calculates the necessary exposure parameters for capturing a properly exposed image. This integration of advanced technology allows for greater accuracy and flexibility in managing shutter functions and capturing optimal photographs.
There are two ways to manipulate curtains in focal-plane shutters: parallel and vertical.
Parallel focal-plane shutter
Vertical focal-plane shutter
Furthermore, the vertical focal-plane shutter’s design minimizes the risk of distortion and uneven exposure across the frame. As the top curtain starts to move, it uncovers the sensor or film uniformly from top to bottom. The bottom curtain follows closely, maintaining a consistent exposure duration throughout the frame. This synchronized movement contributes to capturing images with consistent lighting and reduced chances of vignetting or uneven exposure, especially at higher shutter speeds.
Moreover, the vertical shutter’s design enables a higher maximum shutter speed capability. As the curtains move vertically, the distance they need to cover is shorter than in a horizontal shutter’s lateral movement. This allows for quicker exposure times, beneficial for freezing fast-moving subjects or capturing shots in brightly lit conditions. The vertical focal-plane shutter’s swift action is crucial for demanding photography situations where precise control over light intake is essential.
In addition, the vertical focal-plane shutter’s mechanics often result in quieter operation compared to horizontal shutters. The curtains’ vertical movement involves less mechanical complexity and friction, leading to a quieter and smoother shooting experience. This is particularly advantageous when photographing in settings that require discretion or in situations where a loud shutter sound could be distracting.
In conclusion, the adoption of vertical focal-plane shutters in modern DSLR cameras offers distinct advantages in terms of exposure accuracy, speed, and operational noise reduction. Their efficient up-and-down movement ensures uniform exposure across the frame, facilitates higher shutter speeds, and contributes to a quieter overall shooting experience. These benefits make vertical focal-plane shutters a crucial component in achieving precise and optimal image capture.
This process allows the sensor to effectively perceive changes in the environment’s illumination. The synchronized motion of the curtains ensures that the entire area within the parallel gap is scanned systematically, guaranteeing comprehensive coverage. The variations in light intensity that the sensor detects during this scanning process provide valuable information about the intensity, duration, and possibly even the color of the incoming light. This data can then be processed and analyzed to extract meaningful insights, such as motion detection, light frequency analysis, or even the identification of specific light sources. By employing this innovative mechanism, the sensor demonstrates its capability to convert light signals into interpretable data, contributing to a wide range of applications in fields such as surveillance, automation, and scientific research.When the duration of time being considered is short, it is commonly denoted as a “shot” or alternatively as a “fast exposure.” This terminology is often employed in various fields such as photography, cinematography, and experimental sciences, where capturing a brief moment or event is of paramount importance. In these contexts, a “shot” or a “fast exposure” allows for the depiction of rapid actions, fleeting emotions, or instantaneous phenomena that might otherwise be imperceptible to the naked eye. The utilization of such terminology underscores the significance of time as a variable that can be manipulated and harnessed to reveal unique insights and perspectives.
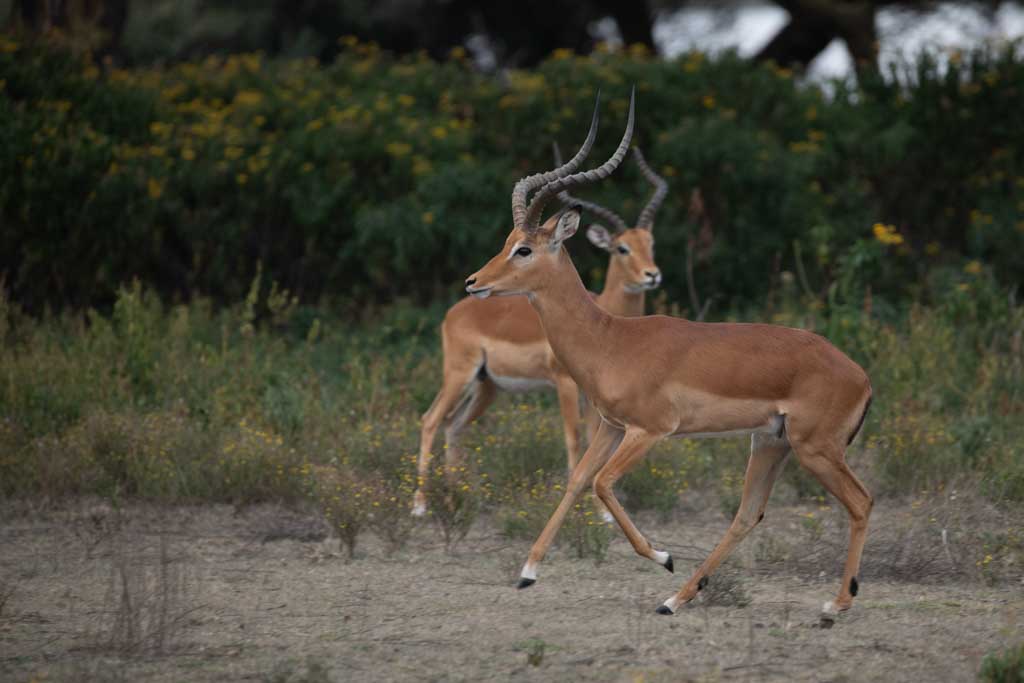
Walk with dignity. Photography – Abin Alex |Camera: Canon EOS 5D Mark IV, Focal Length: 400 mm, Aperture: f/5.6. , Shutter speed : 1/400 sec., ISO:800

When the shutter is activated in cameras, the image can be scanned onto the sensor using various methods. One common method is the rolling shutter, where the sensor captures the image sequentially by scanning across its rows or columns. This can sometimes lead to distortion in fast-moving scenes due to the time gap between the top and bottom parts of the image being recorded.
Another method is the global shutter, where the entire sensor captures the image simultaneously. This eliminates the distortion issues seen in rolling shutters, making it suitable for capturing fast-paced action accurately. However, implementing a global shutter can be more complex and costly.
Each method has its advantages and drawbacks, and the choice of scanning method often depends on the camera’s intended use and the desired image quality.
Rolling shutter
Global Shutter
Focal-plane shutters function by moving a curtain across the sensor, typically from the top to the bottom, scanning line by line through the gap. This process captures undistorted images without introducing any motion-related distortions. This phenomenon is commonly referred to as a rolling shutter.
The diagram above illustrates the duration for which the rolling shutter sensor is exposed to light. The exposure time varies due to the processes of resetting and reading out the sensor. When there is motion either from the camera or the subject, this exposure time difference can lead to image distortion. However, rolling shutter sensors excel in sensitivity when capturing images of stationary or slowly moving subjects.
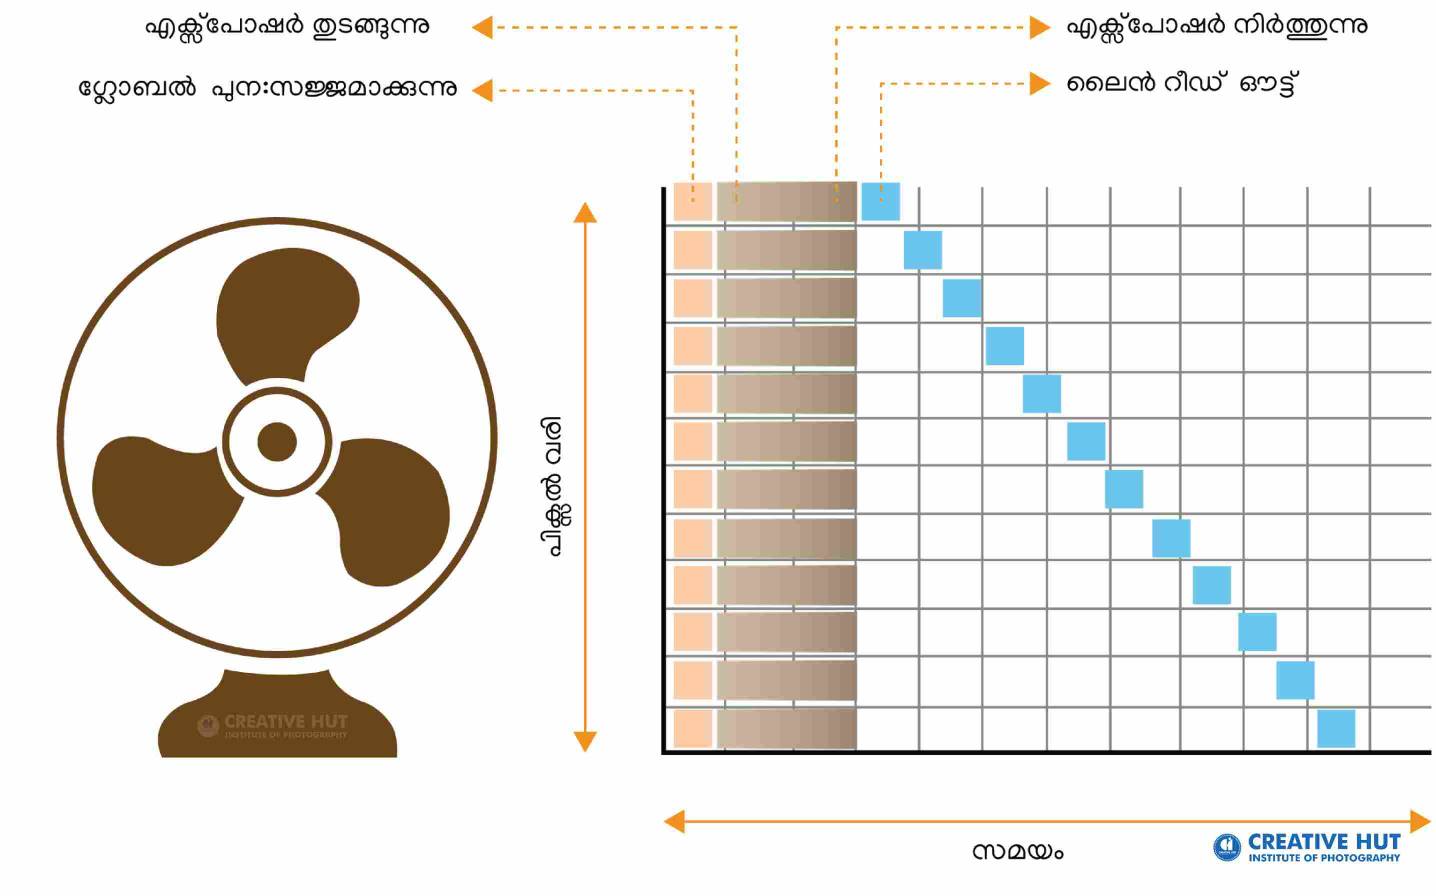
A rolling shutter is a prevalent feature in mirrorless and DSLR cameras. In contrast, a global shutter captures the entire image area all at once on the sensor. Global shutters are commonly utilized in medium format cameras, large format cameras, and cinematic cameras.
How does the focal-plane shutter of a DSLR camera work?
At the beginning of each exposure, the first curtain is completely closed, while the second curtain remains fully open. Once the exposure is finished, the camera returns to this initial position, ready for the next shot.
When the exposure concludes, the initial curtain is entirely raised, while the second curtain remains completely shut.
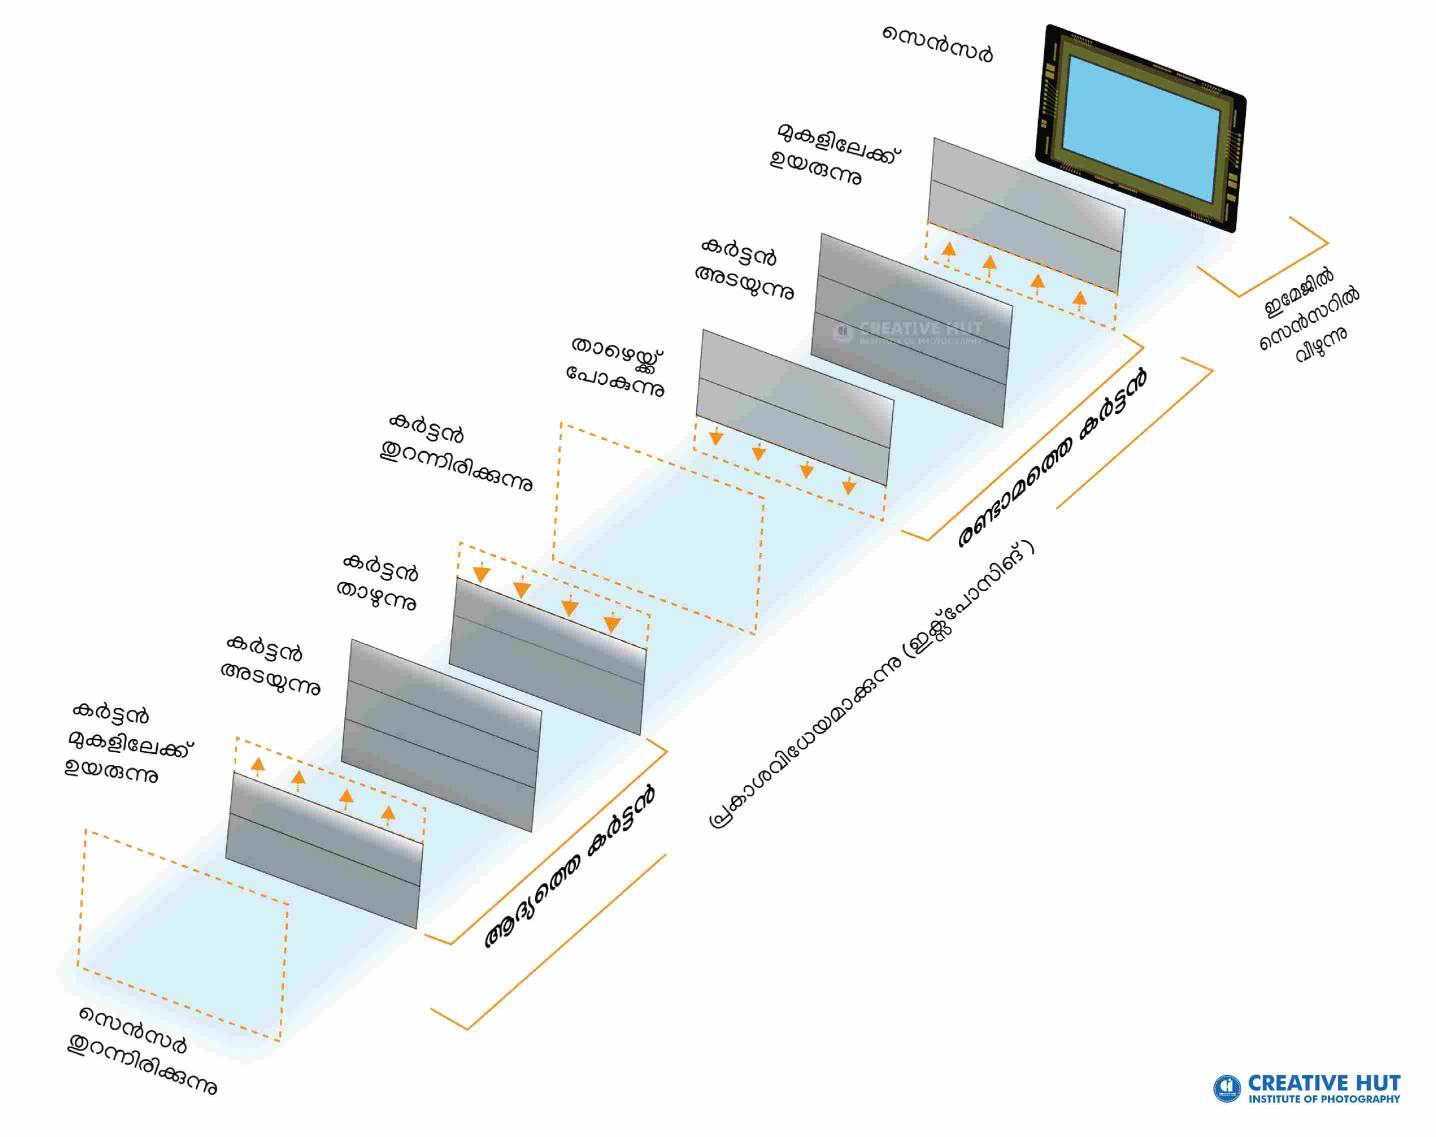
How does the focal-plane shutter of a mirrorless camera work?
When the shutter button is pressed, a door immediately moves upwards to shield the sensor. Once the hair clears the sensor, the exposure process begins. Subsequently, the upper door descends, allowing the sensor to be exposed. Afterward, a second door moves downward to conceal the sensor again. At this point, the sensor ceases exposure, and the doors return to their initial positions to reset the system.

Camera: Canon EOS 5D Mark IV, Focal Length: 200mm, Aperture: f/5, Shutter Speed: 1/1000 sec., ISO:400
Make sure your eye and camera are always in focus. Photography – Abin Alex | Camera: Canon EOS 5D Mark IV, Focal Length: 200mm, Aperture: f/5, Shutter Speed: 1/1000 sec., ISO:400
The illustration on the right displays the duration for which a global shutter sensor is exposed to light. In this scenario, all pixels initiate and conclude their exposure simultaneously, while the readout process takes place sequentially. This timing ensures the creation of images without any distortion or blurring caused by movement. Global shutter sensors are essential for capturing swiftly moving subjects. In summary, the synchronized exposure and sequential readout of global shutter sensors maintain image integrity and are particularly useful for capturing high-speed motion.
Electronic Front-Curtain Shutter (EFCS)
Shutter shock presents a challenge in certain scenarios, particularly when using DSLR and mirrorless cameras, especially those equipped with longer focal length lenses. This issue can manifest when using both very slow and fast shutter speeds, particularly with extended focal lengths like telephoto and super telephoto lenses. The root cause of this problem is the inadvertent camera shake induced by the shutter’s operation.The phenomenon you’re referring to is called “shutter shock.” Electronic front-curtain shutter (EFCS), also known as electronic first shutter curtain (EFSC), is a technique used within the camera to eliminate the camera shake that can occur due to the traditional shutter mechanism.
At the start of the exposure, when the front curtain is in motion, any vibrations it generates can lead to camera shake and result in blurry images. However, the second curtain (rear curtain) doesn’t produce such shaking effects.
EFCS (Electronic First Curtain Shutter) can be utilized while capturing images in Live View mode on a DSLR or on a mirrorless camera that displays the real-time scene through the camera’s LCD or Electronic Viewfinder (EVF).
When the Electronic Front-Curtain Shutter (EFCS) is disabled, the camera’s shutter remains open while you’re in live view mode before capturing an image. Once you press the shutter button to take a photo, the front curtain closes, initiating the exposure. Subsequently, it reopens briefly to allow light to reach the sensor according to the chosen exposure duration. After the exposure is finished, the rear curtain closes to complete the image capture process.
When using slower shutter speeds, it’s possible to hear a double shutter sound. This occurs because there are two separate curtains in the camera’s shutter mechanism: one at the front and one at the rear. To experience this, set your camera to a shutter speed significantly slower than one second.
When the EFCS (Electronic Front-Curtain Shutter) is activated, the front curtain of the camera is open, allowing light to directly reach the camera sensor. In this scenario, an electronic curtain within the sensor itself also opens, permitting light to pass through the sensor according to the chosen exposure duration. Once the exposure time is finished, the rear curtain closes, producing only the audible sound of the rear curtain shutter closing.
Shutter speed
The shutter opens when the camera button is depressed, letting light enter through the lens and land on the sensor. The shutter instantly closes when the sensor has captured the light. The shutter speed, also known as the exposure time, is the length of time the shutter is open and represents the amount of time the sensor is exposed to light.
How shutter speed is measured
“Adjusting the shutter speed by doubling or halving it corresponds to a change of 1 stop in exposure. Shutter speed is quantified in fractions of a second for values less than one second. For instance, a value of 1/4 represents a quarter of a second, while 1/250 signifies two hundred and fifty seconds (equivalent to four milliseconds).”
The majority of contemporary DSLRs and mirrorless cameras are capable of accommodating shutter speeds of up to 1/4000 of a second, while certain models can even manage speeds as swift as 1/8000 of a second. Conversely, the lengthiest shutter speed typically offered is around 30 seconds. Additionally, a number of cameras feature a “bulb” mode, enabling the shutter to remain open for an indefinite duration as required.
It is beyond vision when it captures moments by moments. Photography – Abin Alex |Camera: Canon EOS 5D Mark lV, Focal Length: 200mm, Aperture: f/5, Shutter Speed: 1/1000 sec., ISO:400
Introducing a universal scale for quantifying the amplification and reduction of light, referred to as “stops.” This stop metric serves as a gauge for determining the duration of the shutter speed and can be adjusted incrementally in a forward direction.
One stop
One third stop
Half stop
Shutter speed
One stop
1/2 stop
1/3 stop
Safety shutter
Types of shooting
1/2000
1/2000
1/1500
1/2000
1/1600
1/1500
Birds in flight 1/2000

1/1000
1/1000
1/750
1/1000
1/1800
1/640
Action Sports 1/500-1/100

1/1500
1/1500
1/1350
1/1500
1/1400
1/1320
Street photos 1/250-1/500

1/1250
1/1250
1/180
1/1250
1/1200
1/160
Landscapes 1/125

1/125
1/125
1/90
1/125
1/100
1/80
Panning shot 1/15-1/60

1/160
1/60
1/45
1/60
1/50
1/40
Exposure time
Shutter speed, also known as exposure time, refers to the duration that light requires to reach the camera’s sensors.
1/30
1/30
1/20
1/30
1/25
1/20
One stop
1/2 stop
1/3 stop
Safety shutter
Types of shooting
1/15
1/15
1/10
1/15
1/13
1/10
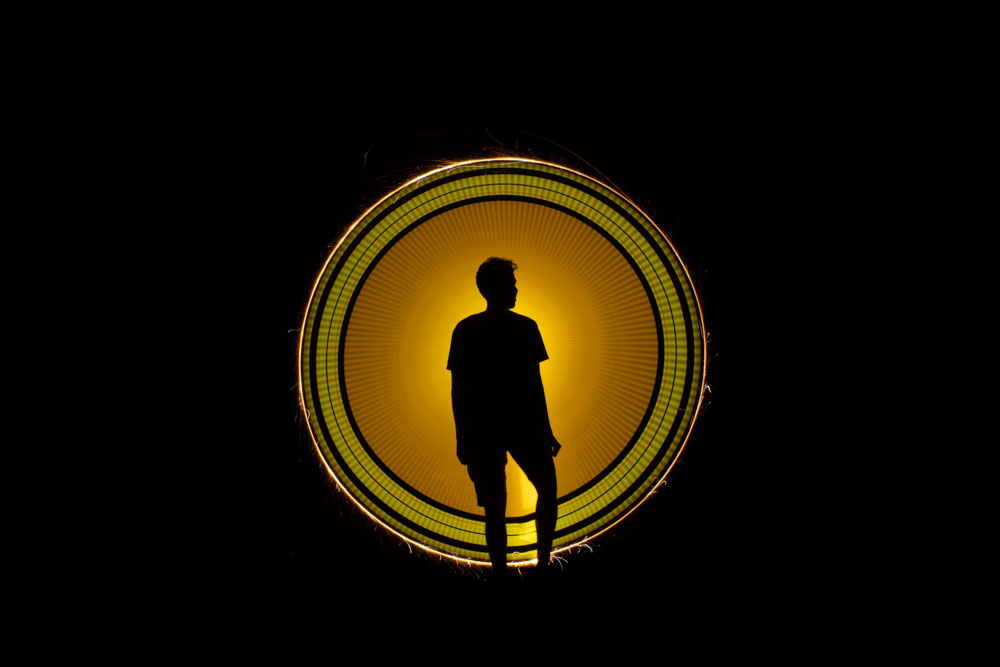
Lens Circle : 1/15 sec

1/8
1/8
1/6
1/8
1/6
1/5
Waterfall : 1/8-2 sec

1/4
1/4
0.3
1/4
0.3
0.4
Potion : 2-4 sec.

0.5
0.5
0.7
0.5
0.6
0.8
Steel Wool -10 seconds

1
1
1.5
1
1.3
1.6
Stars : 15-25 sec.
2
2
3
2
2.5
3.2
Milky Way : 15-20 sec.

4
4
6
4
5
6
Star Trail : 15 mins and up

One stop
Certainly! It seems like you’re discussing the relationship between shutter speed, light exposure, and stops in photography. If the shutter speed is doubled, the time the shutter remains open is reduced by half, resulting in half the amount of light reaching the camera’s sensor. This change corresponds to a one-stop alteration in exposure. In photography, a “stop” signifies either a doubling or halving of the light entering the camera. To calculate shutter stops, you can use the equation: Shutter Stops = log2(New Shutter Speed / Original Shutter Speed). This equation helps quantify the change in exposure when adjusting shutter speeds.
By dividing the current number by 2, you can raise the shutter speed by one stop. For instance, dividing a shutter speed by two yields a new shutter speed of 1/2 second if the initial shutter speed is 1 second. On the other side, you can multiply the current value by two if you wish to reduce the shutter speed by one stop. For instance, if you start with a 1/4 second shutter speed and multiply it by 2, the result is a 1/2 second shutter speed. The amount of light the camera sensor can catch as a result of this change is effectively doubled.
One of the most creative facets of photography lies in the mastery of shutter speed control. The option to select faster shutter speeds allows photographers to freeze fast-paced action with remarkable precision. This is particularly useful for capturing sports events, wildlife in motion, or any scene where capturing split-second moments is crucial. On the other hand, opting for slower shutter speeds introduces a world of artistic possibilities. By intentionally blurring moving subjects, photographers can convey a sense of dynamic motion and energy. This technique is often employed in capturing the graceful flow of waterfalls, the streaks of car lights in a cityscape at night, or the mesmerizing trails of stars in long-exposure astrophotography. The manipulation of shutter speed thus becomes a powerful tool for photographers to translate their creative visions into stunning visual narratives.
Image Stabilization

Image stabilization (IS) is a method employed to decrease the blurring effect caused by the movement of a camera or any imaging equipment while capturing an image. This blurring, known as shake, becomes especially problematic in situations involving stationary cameras, sluggish shutter speeds, or cameras equipped with lenses possessing a significant focal length, such as telephoto zoom lenses.
In the realm of film cameras, in-camera stabilization was deemed too costly to incorporate, prompting Canon and Nikon to prioritize lens stabilization instead. Canon introduced the IS (Image Stabilization) lens in 1995 with the 75-300mm lens model. This system required approximately one second to achieve stabilization and offered around a two-stop improvement in stability. However, it was not ideal for scenarios involving tripods or panning movements.
Nikon introduced its inaugural VR lens in 2000, while Konica Minolta (later acquired by Sony) pioneered sensor stabilization with its Minolta Dimage A1 camera. However, the conventional DSLR design poses a challenge for sensor stabilization since the stabilizing effect isn’t visible through the viewfinder due to the mirror obstructing the sensor.Canon employs Image Stabilization (IS) in their lenses, while Nikon utilizes the term “Vibration Reduction” (VR) for their lens stabilization, and other companies like Sigma refer to it as “Optical Stabilization” (OS). In addition, in-body image stabilization is frequently employed in mirrorless cameras.
To reduce vibrations in a camera, there are essentially three vibration reduction technologies.
In-body image stabilization
Optical image stabilization
Digital Image Stabilization
The camera comes first, then comes the lens, and then other software strategies are used.
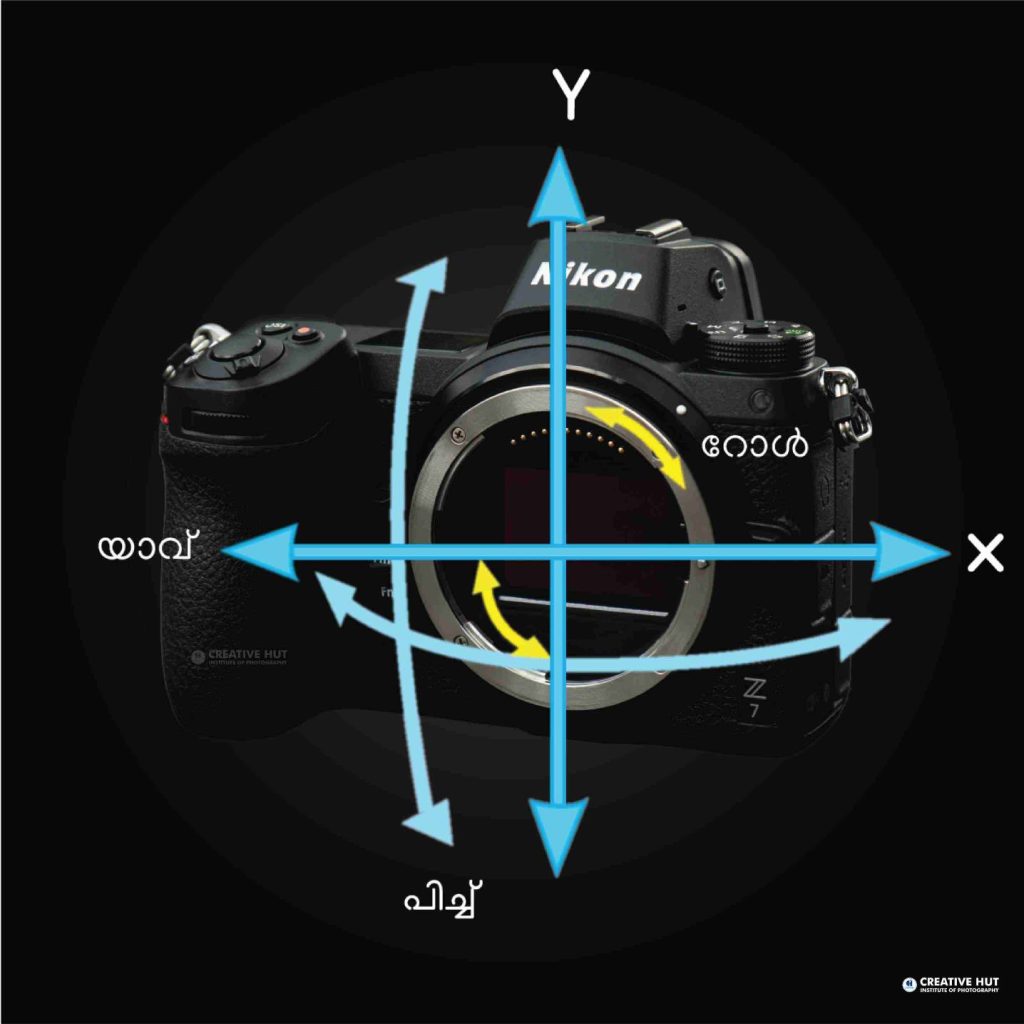
Five-axis
1.Slides the camera up or down. (Y-Axis)
2.Slides the camera left or right. (X-Axis)
3.The camera can rotate around the lens (X & Y axis).
4.The camera can tilt up or down (pitch).
5.The camera can tilt left or right (yaw)
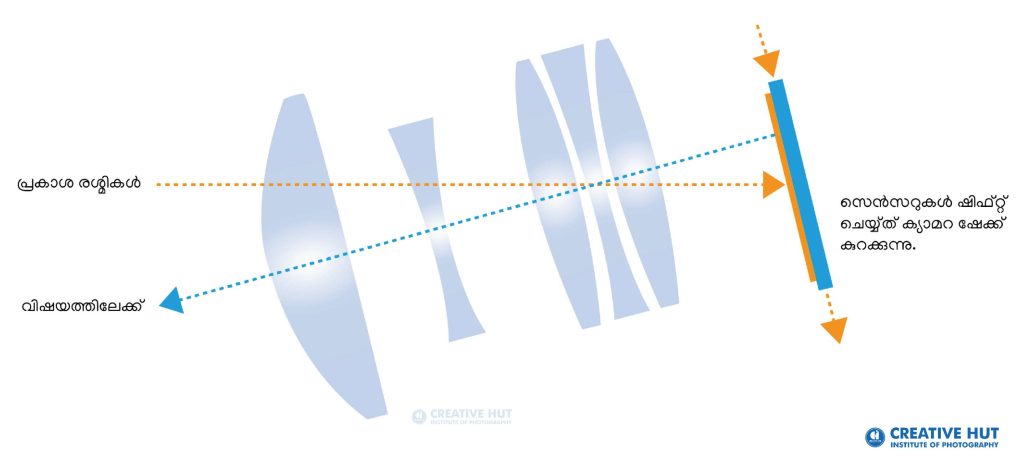
In-body image stabilization
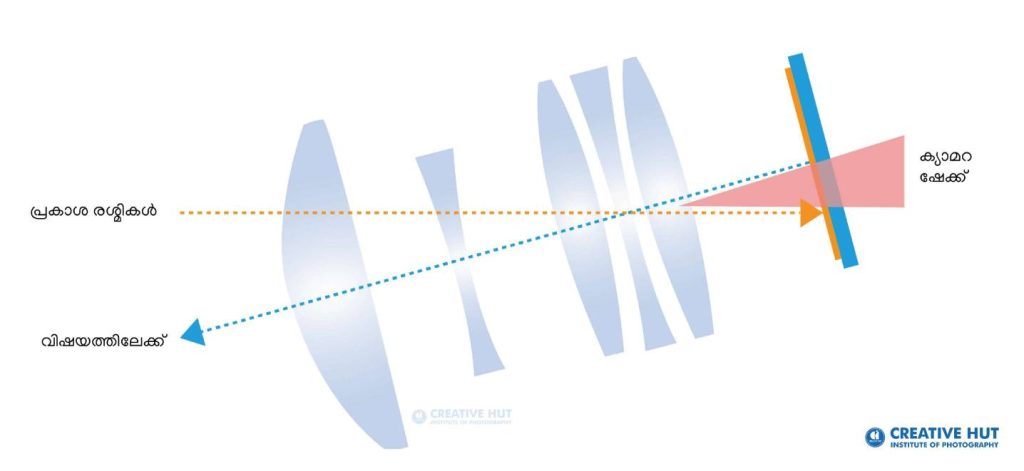
Built-in stabilization (IBS) functions by utilizing the camera’s internal sensor to counteract the effects of shaky movement. This is achieved by employing built-in accelerometers that gauge sideways movements, allowing the sensor to counterbalance by shifting in various directions such as left, right, up, and down. Additionally, cameras are equipped with integrated gyroscopes to identify rotational motion and make appropriate adjustments.
Pitch, yaw, and roll refer to rotational movements and are typically detected by gyroscopes. The impact of these rotations changes based on the subject’s distance. On the other hand, vertical and horizontal camera shifts are translational motions detected by accelerometers. These translation effects become more noticeable when using higher levels of magnification, and their significance is influenced by the subject’s distance.
Modern mirrorless cameras have a stabilization range of 1 to 8 stops.
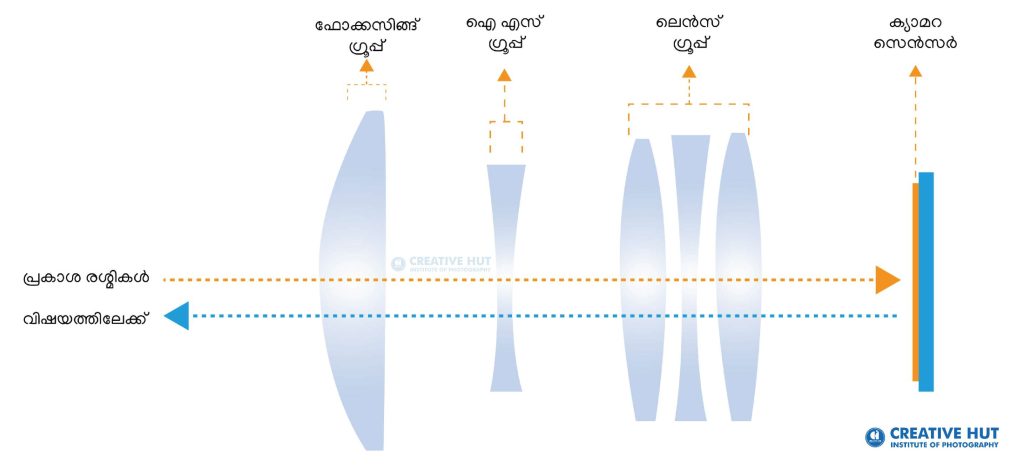
Lens image stabilization
Furthermore, image stabilization technology plays a crucial role in enhancing the quality of videos. It helps to minimize the jarring effects of camera movement, producing smoother and more cinematic footage. Whether shooting handheld or using compatible stabilization accessories, such as gimbals, videographers can achieve steady shots without the need for bulky and cumbersome equipment.
Modern mirrorless cameras often offer a range of stabilization modes to cater to various shooting scenarios. For instance, they might include modes like “Panning” for capturing moving subjects, “Active” for intense motion situations, and even “Hybrid” modes that combine in-body stabilization with lens-based stabilization for optimal results. This adaptability empowers photographers and videographers to maintain creative flexibility while still benefiting from the advantages of stabilization technology.
In conclusion, the advancement of image stabilization in mirrorless cameras represents a significant leap in photographic technology. By mitigating the challenges posed by camera shake, this innovation democratizes the ability to produce high-quality images and videos, making it easier for enthusiasts and professionals alike to achieve exceptional visual content under diverse conditions.
This process allows for real-time detection of the camera’s speed and angle through gyroscopes, with the collected sensor data then being transmitted to the microcomputer within the lens. The microcomputer analyzes this data to generate recommendations for adjusting the stabilization lens group, ensuring effective stabilization of the captured images or videos.
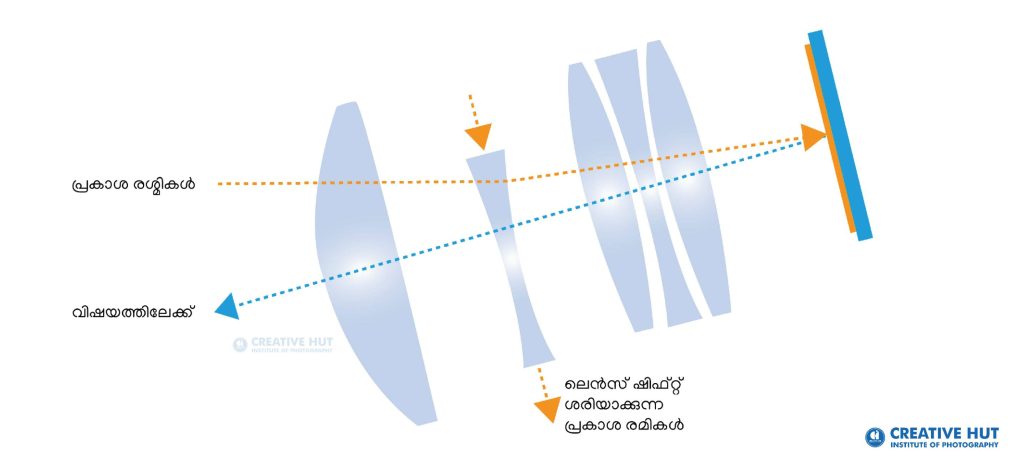
The mechanism described above embodies an advanced image stabilization technology that plays a pivotal role in enhancing the quality of captured visuals. By swiftly processing the input about camera movements, this system activates the corresponding stabilization lens group. This group then promptly adjusts its position and velocity, effectively counterbalancing the impact of any camera shake. The seamless and uninterrupted repetition of this process ensures that even the slightest alterations in the degree or orientation of the camera shake are instantaneously recognized and offset. This seamless interaction between technology and optics leads to consistently sharp and steady images, significantly elevating the overall imaging experience for photographers and videographers alike.

Captures the moments of the bull run. Photography – Abin Alex |Camera: Canon EOS 1100D, Focal Length: 100mm, Aperture: f/5.6, Shutter Speed: 1/600sec., ISO:100
Fast (freeze) shutter speed
It’s crucial to remember that adjusting the aperture and ISO has trade-offs. The depth of field is impacted by widening the aperture (using a lower f-stop value), which also lets in more light for the camera. A narrower depth of field produced by a wider aperture can be artistically exploited to separate the subject from the backdrop. However, boosting the ISO sensitivity reduces digital noise or graininess in the image, especially at higher ISO settings, while increasing the camera’s sensor’s sensitivity to light. Careful consideration of the unique shooting circumstances and intended aesthetic results is necessary while balancing these settings. For instance, you can choose a higher shutter speed, larger aperture, and lower ISO if you want to freeze quick motion in a well-lit scene. On the other hand, in low-light conditions, you might need to make some image quality sacrifices and choose for a higher ISO and a wider aperture in order to keep a reasonable shutter speed for catching movement without creating too much blur. In essence, combining shutter speed, aperture, and ISO adjustments enables photographers to respond to a variety of situations, capturing dynamic subjects while preserving the ideal exposure and image quality. Even in difficult lighting and movement situations, experimenting with these variables and understanding how they interact can result in arresting and lasting images.
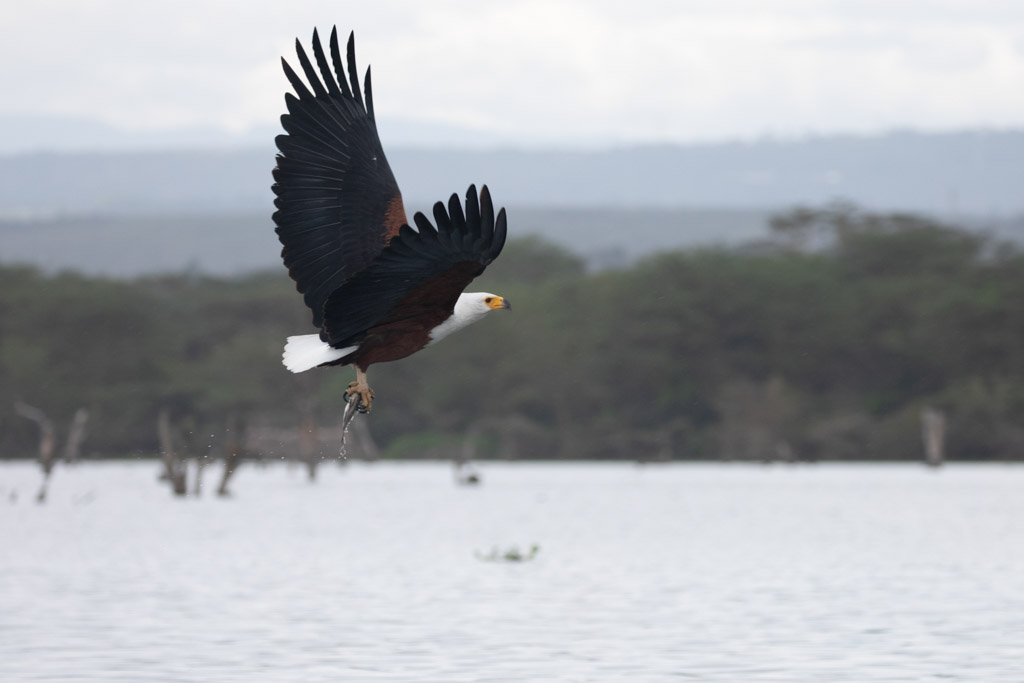
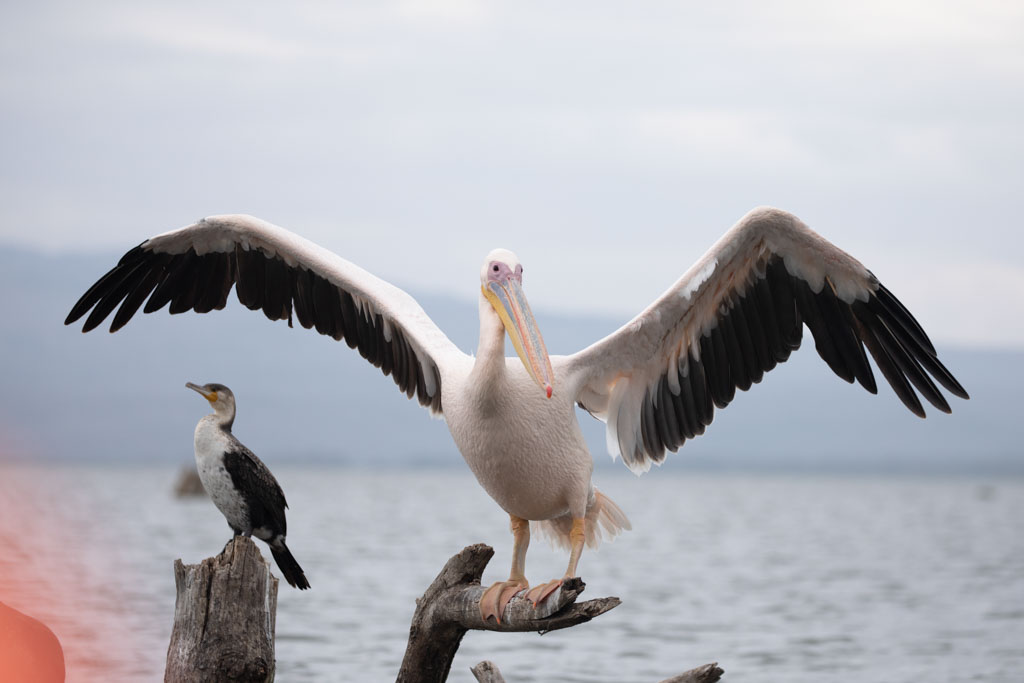
Absolutely, fast shutter speeds are essential in various photography scenarios to capture moments that happen in the blink of an eye. Whether it’s the adrenaline-pumping action of high-speed vehicles, the graceful flight of birds, or the delicate details of raindrops suspended in the air, using fast shutter speeds allows photographers to freeze these dynamic scenes with incredible precision and detail. It’s a powerful technique that transforms fleeting moments into timeless images.

Ink Squash Photography. Photography – Abin Alex | Camera: Canon EOS 80D, Focal Length: 78mm, Aperture: f/5.6, Shutter Speed: 1/100sec., ISO:100

Camera: Canon EOS 6D, Focal Length: 60mm, Aperture: f/8, Shutter Speed: 1/160sec., ISO: 200


Experiment
Make sure the camera is set to a high shutter speed and a quick frame rate to capture the motion in detail in order to provide a clear and stable video of the bursting moment.
Using a black curtain on the outside of the subject can help control the amount of light entering the camera and prevent unwanted reflections or glare. When shooting with ISO 100, adjusting the shutter speed allows you to capture both high-speed action and slow-moving subjects effectively. To optimize exposure, it’s important to also adapt the aperture settings according to the available light conditions.
Long exposure
By adjusting the shutter speed, photographers gain the power to freeze fast-paced action or blur movement intentionally, thus crafting a narrative within a single frame. A swift shutter freeze can transform a high-speed sports event into a collection of suspended moments, each revealing intricate details imperceptible to the naked eye. Conversely, a deliberate slow shutter can smudge the trajectory of lights, vehicles, or people, painting a vivid tapestry of streaks and trails that evoke a surreal dreamscape. This versatile technique enables photographers to transcend reality, inviting viewers to experience time in a fresh and exhilarating way while igniting their imagination through the interplay of light, motion, and emotion. Furthermore, the creative use of a slow shutter speed in photography can introduce an element of intrigue and storytelling to images. By intentionally allowing for longer exposure times, photographers can capture the passage of time in a single frame. This technique is particularly effective in scenarios where subjects are in motion, such as flowing waterfalls, bustling city streets, or moving vehicles. The resulting images reveal streaks of light, blurred shapes, and a distinct sense of fluidity that adds depth and emotion to the composition. This transformation of ordinary moments into ethereal, almost dream-like scenes invites viewers to ponder the passage of time and the transient nature of the world around us. In essence, employing slow shutter speeds is not just a technical choice, but a creative tool that photographers can wield to convey a unique narrative and evoke emotions in their audience.
500/600 rule
The “500 Rule” or the “600 Rule,” to which you’re referring, determines the highest shutter speed that can be employed in astrophotography to catch star points without obtrusive star trailing. Depending on whatever version you’re using, divide 500 or 600 by the focal length of the lens you’re using to apply the rule. You would divide 500 by 24 in your example using the 500 Rule and a 24mm lens on a full-frame camera, giving you 20.83 seconds.You might round this down to 20 seconds to guarantee there isn’t any star trailing. A professional photographer can use this rule to estimate the best exposure time to catch crisp stars without recording their motion caused by the Earth’s rotation.
Absolutely, achieving beautiful night sky images in astrophotography requires striking the ideal balance between exposure time, aperture, and ISO. The aperture setting, in addition to the shutter speed, is crucial for catching the brilliance and fine details of stars. More light can reach the camera sensor with a larger aperture (lower f-number), which makes stars appear brighter and makes faint details in the night sky easier to see.
Wider apertures can, however, also bring about distortions like coma and vignette, which may degrade the quality of the stars in your photographs. These problems can be reduced by balancing the aperture with the shutter speed and ISO setting.
Your astrophotos’ overall brightness and noise levels are greatly influenced by the ISO setting. In low-light situations, raising the ISO can assist capture more light, but it can also add digital noise. Finding the ideal balance between brightness and noise is still crucial, even if modern cameras can frequently handle higher ISO settings better.
In the end, astrophotography calls for experimentation and modifying these settings according to the particulars of your shoot, the tools you’re employing, and the artistic result you’re striving for. The night sky can be captured in breath-taking photos that perfectly capture the beauty and majesty of celestial objects by fusing technical expertise with artistic vision.

Experiment-Star Trial
Star trails occur when the Earth’s rotation causes the stars to move across the camera’s field of view during a long exposure, creating streaks of light instead of distinct points. This effect can be creatively captured to showcase the Earth’s rotation and the passage of time in a single photograph.
Capturing a star trail image involves using a camera mounted on a stationary tripod to take multiple long-exposure images of the night sky, where the stars appear as dots due to the Earth’s rotation. These individual images are later combined using specialized software to create a stunning composite image that showcases the apparent movement of the stars over time.
Tube painting photography. Photography – Abin Alex | Camera: Canon EOS 1500D, Focal length: 21mm, Aperture: f/22, Shutter speed: 2sec., ISO:100
Experiment – Tube painting
In this composition, the main subject remains stationary, while the contrast-enhancing tube is connected to their back. The camera is securely placed on a stable surface or tripod to ensure a steady shot. With an ISO setting of 100 and a long exposure shutter speed, the camera captures the scene with exquisite detail. The aperture is adjusted to optimize the exposure based on the available light conditions.

Light painting photography. Photography – Abin Alex | Camera: Canon EOS 5D Mark III, Focal length: 70 mm, Aperture: f/22, Shutter speed: 10sec., ISO:100
Experiment – Light Painting
Mark the area where you wish to take the photo with a laser light or torch. Put the camera on a tripod or a solid surface. Set the shutter speed to long exposure and ISO 100. Adjust the aperture based on the light.

Light Trail Photography – Photography -Abin Alex | Camera: Canon EOS 6D, Focal length: 24 mm, Aperture: f/22, Shutter speed: 30sec., ISO: 100
Experiment – Light Trial
Look for a location with a lot of moving traffic and dim lighting. Put the camera on a tripod or a stable surface. Place ISO 100. Shutter speeds should be slowed down to catch moving lights. Adjust the aperture based on the light.
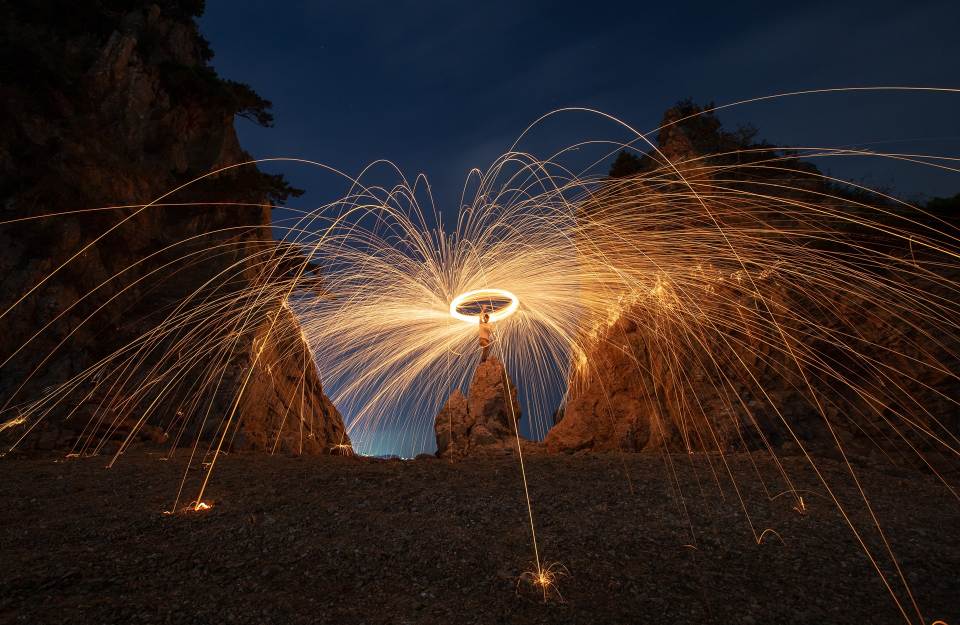
Still Wool Photography. Photography – Abin Alex | Camera : Canon EOS 6D, Focal length : 16 mm, Aperture : f/5.6, Shutter speed : 1/47sec., ISO : 100
Experiment – Still Wool Photography
The still wool should be lit, then spun in the air. generating sparks that illuminate the night sky. Use a long exposure to capture the camera. Put the camera on a tripod or a solid surface. Set the shutter speed to a long exposure and the ISO to 100. Adjust the aperture based on the light.

Panning Photography. Photography- Abin Alex | Camera : Canon EOS 700D, Focal length : 18 mm, Aperture : f/4.5, Shutter speed : 1/100sec., ISO : 100
Experiment – Panning
Panning is a dynamic photographic technique that involves smoothly moving the camera alongside a moving subject. To achieve optimal results, synchronize the camera’s panning speed with the subject’s motion while adjusting the shutter speed accordingly. Maintain a low ISO setting of 100 to ensure optimal image quality, and fine-tune the aperture to suit the prevailing lighting conditions.

The best and the worst are always around us. Photography- Abin Alex | Camera : Canon EOS 700D, Focal length : 18 mm, Aperture : f/4.5, Shutter speed : 1/100sec., ISO : 100